Why I overexpose my photographs (….most of the time)
Photography is an art form.
It’s important to say that. For some reason this fact seems to get lost in lots of discussions about photography.
Let me start off by saying that I believe there is no such thing as the “Right Way” or the “Wrong Way” to create photographs. If the equipment, techniques, software, and process you use creates the photographs you want to make, then you’re doing it right. End of story. It doesn’t matter what anyone else says or thinks.
Like many other art forms photography relies on the tools we choose and how they work. What\’s more important is how we use, or elect not to use, those tools.
We don’t all shoot the same. We have different reasons for shooting. Different artistic aesthetics. Different philosophical thoughts on how to approach the medium.
Nothing I’m about to say here is intended as a criticism of another photographer’s approach or technique. It’s meant as an explanation of why I shoot the way I do. I also hope it will spark discussion and experimentation.
A few things about how and what I do.
- I abandoned film photography with the purchase of my first digital camera in 2001. My darkroom equipment will continue to languish in storage.
- As a portrait studio owner, most of my shooting is for clients. I need to make them happy. I do a fair amount of personal project shooting. They are topics that I enjoy and will probably never generate any income. These are meant to make me happy.
- I shoot with Canon cameras, either a 5Dmk3 or 5Dmk4. I like the way Canon cameras are designed and operate. Their menu architecture has always been intuitive to me. Like all digital cameras they have their benefits and disadvantages.
- I shoot using RAW format
- I post process with Lightroom and Photoshop. To me photography is a two-part process; shooting and developing. I probably think this way having grown up shooting film. Digital photographs must be developed somewhere. Our two choices are the computer in the camera or using processing software on a laptop or desktop computer. I opt to process on a laptop or desktop.
- I shoot with the assumption that every photograph will wind up as 20×30 print hanging on a wall someplace. Although most of them don\’t.
Now that the preliminaries are out of the way I can get to the heart of this discussion – over exposing.

Expose to the Right
The technique is called ‘Expose to the Right’ (ETTR) and has been around since digital photography became a mainstream thing. The approach has two basic parts.
- When shooting, overexpose the image as much as you can without losing any important detail. This is super critical. More on it in a minute.
- In post processing (Lightroom in my case) darken the image to brightness you desire.
Wait….Why? What the What?
It may seem silly to overexpose when shooting just to darken the image when processing. But the idea is to create digital image files with richer gradients, less noise, and more detail in the darker parts of the photo.
The idea behind this has to do with the way digital cameras capture, convert, and store light data. To explain how this works I’ll use my Canon 5Dmk4 as an example. This camera has a 14 stop dynamic range and creates 14-bit image files. Nikon, Sony, Panasonic, Leica, and Olympus all have camera bodies with similar performance.
The ‘14-bit’ item is important. It determines how many tonal shades from black (without detail) to white (without detail) the camera can create and store. A 14-bit camera can create 16,384 shades from pure black to pure white.
This is where the 14 stop dynamic range of my camera plays a big role.
You would think that each stop of dynamic range would get an equal share of the available tonal values – about 1170. Unfortunately that is not how the values are actually distributed.
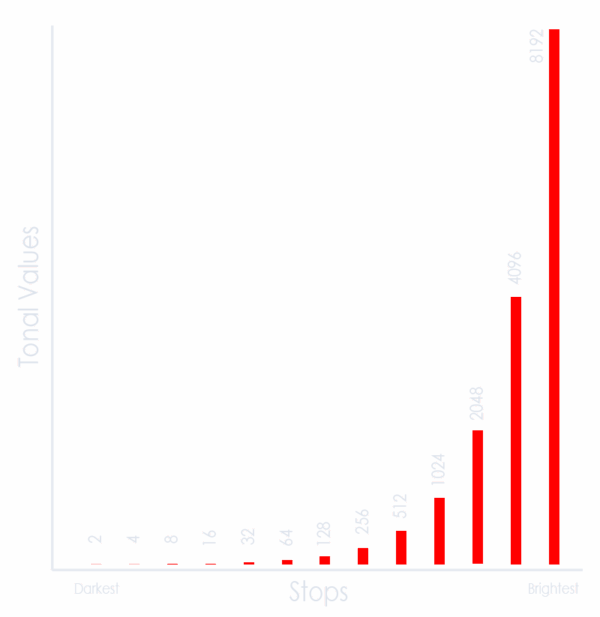
Keep in mind that a stop represents a doubling or halving of light. So the brightest stop gets half of all the tonal values possible. In this case 8192. The second brightest stop gets 4096. The third brightest, 2048. Each following stop gets half of the tonal values remaining. The darkest stop gets only two tonal values.
What is digital noise? In a general sense noise is aberrant pixels. These pixels are not depicting the color or exposure of their portion of the image correctly.
Digitial noise is more pronounced in darker portions of a photograph. The darker the shades the more that noise becomes apparent. This is because the signal to noise ratio is low. (You can read more about noise in digital images in this article by Cambridge in Colour). When we brighten an image in post processing the noise becomes brighter and more noticeable.
The example images below were shot in sequence beginning with a proper exposure. The following photos were intentionally underexposed by 1, 3, and 5 stops. In Lightroom I used the exposure control to bring the three underexposed images to the correct brightness. What you\’ll notice is that as the amount of underexposure becomes greater, the noise becomes more pronounced.
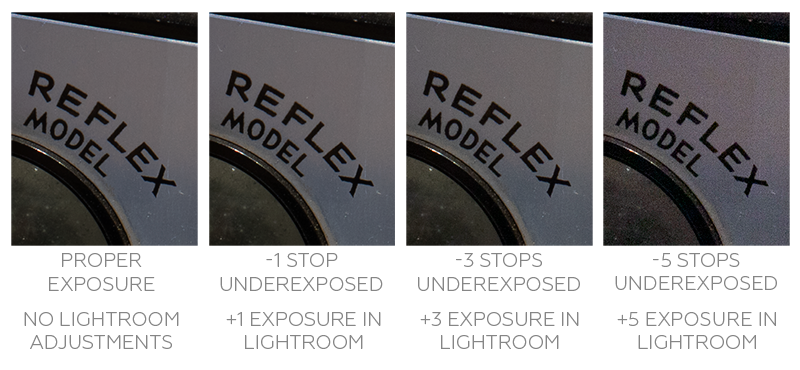
One of the goals of the ETTR technique is to reduce, or hopefully eliminate, noise in our final images.
Shooting
To take advantage of this technique, you must shoot in RAW. This way you are working with the greatest amount of data possible. All this digital information is also unprocessed. The RAW format provides the greatest latitude for making adjustments.
Your camera provides two important tools for adjusting the exposure settings: the histogram and highlights. You may need to enable one or both of these on your camera. Almost all digital cameras provide both of them as a playback display option. On some cameras the live view shooting mode provides a real time histogram.
If you\’re unfamiliar with the histogram, this webpage provides and excellent introduction: The Histogram Explained
The highlights are a visual indication that you have over exposed parts of the image to the point of no return. In the playback mode you may notice that portions of the image are \’blinking\’, typically black and white or red and white. The areas that are blinking are blown out. This means they are so overexposed that all detail is gone. They are just white. It is highly unlikely these areas can be recovered even with advanced photoshop work.
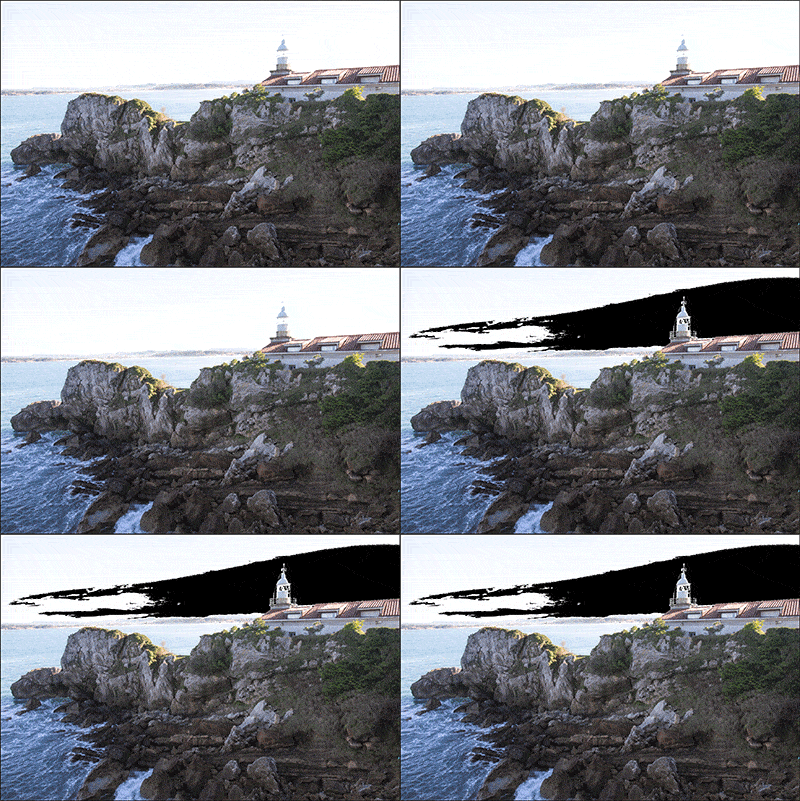
What you do is overexpose the image, but not too much. The key is to overexpose as much as possible with out blowing out or clipping any part of the photograph that matters.
This results in a histogram pushed to the right side of chart. This is where the technique gets its name.
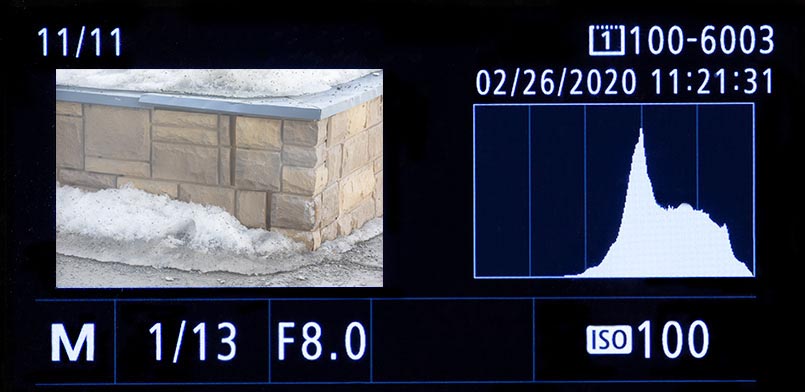
It is super critical to not go too far and blow out parts of the image that matter. Both the histogram and the highlights are key to reviewing your work when shooting. If a review of the playback shows you\’ve overexposed too much simply stop down a bit and re-shoot. What you\’re looking to avoid is a spike on the far right of the chart or parts of the photo that matter are blinking.
Post Processing
Once you get the photos into your processing software make adjustments to create the exposure you have in mind. What you\’re doing is pulling data rich portions of the image into darker areas. You\’ll be surprised at how much you can adjust the image.
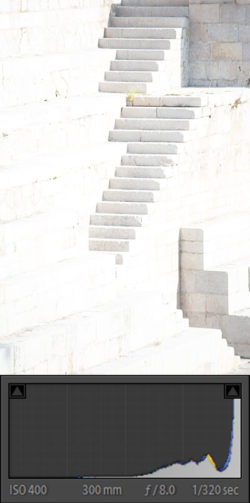
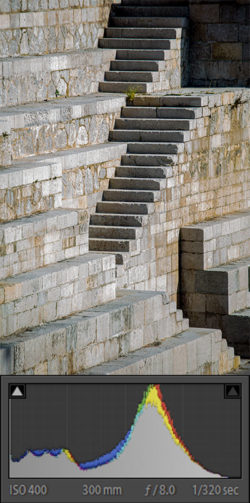
This first photo was taken on our recent trip to Santander, Spain. My test shot was taken at 1/200 and was too overexposed – I had a histogram spike on the right and blinking pixels where I did not want them. So I increased the shutter speed to 1/320 to eliminate both.
In Lightroom I applied a -2 exposure, and also decreased both the shadows and blacks to create the final result. As you can see from the histogram of the final image, I was able to pull the shadows down enough to create clipping in the shadows.
- Straight Out of Camera
- Adjusted in Lightroom
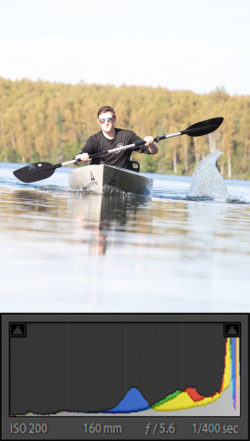
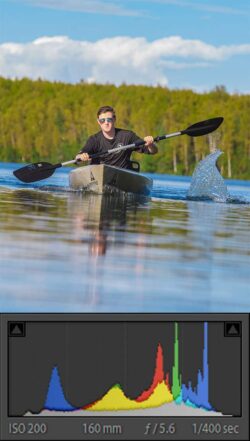
This second photo was taken a while back at Mirror Lake in Chugiak. It was one of a series (about 100) taken using the same exposure settings. Once I had the exposure set I was able to shoot until the light changed. Again, I made adjustments in Lightroom to darken the image to the desired end result.
- Straight Out Of Camera
- Kyak-LR-Adj
When ETTR works…..and when it doesn\’t
No technique works in all situations. This is true for ETTR. Getting the exposure adjusted correctly can sometimes take several attempts. It takes lots of practice to make these changes quickly.
Rapidly changing lighting conditions can be difficult. On a partly sunny day with fast moving clouds that are creating alternating bright and shady conditions makes it difficult, and sometimes, impossible to keep up.
If you are photographing a subject that moves through varying lighting conditions (in and out of shadows into bright light) it can be just as difficult as trying to keep up with a partly sunny day.
Any circumstance that requires you to make a quick exposure decision makes ETTR difficult to use. Some examples would be weddings, wildlife, and outdoor sporting events.
When your histogram results in large peaks very close to the right hand edge of the chart your image can suffer a loss of delicate colors. This can happen with the faint pastel pinks and oranges in clouds around sunset. Read this article by Joaquin Baldwin for a detailed explanation of why this happens.
Conclusion
ETTR is just one of many shooting techniques available to digital photographers. Although I find it great for landscapes, cityscapes, and most portraits it doesn\’t work all the time. But since these three subjects comprise a majority of the photos I create, it is the technique I use most often.
Other techniques I use are ISO invariance and exposure bracketing. Look them up and give them a try as well.
Thanks!



March 26, 2020 @ 8:29 pm
Thank you for this! Really appreciate all the great tips shared. You went over this in your flash class last year, but this helps solidify your explanation.
March 26, 2020 @ 8:43 pm
I’m glad you found it helpful. It might be a technique to try and see how it works for you.
March 28, 2020 @ 11:54 am
Kathy, what model camera are you using? With all this spare time on our hands, now might be a good time to experiment with this technique.
March 28, 2020 @ 12:36 pm
I’m shooting with Nikon D500. I will definitely turn the blinkies on & try this!